

8. Procedure
8.1 Test Start-Up and Operation:
8.1.1 Close all drain valves and petcocks and open the reservoir valve to allow the test fluid to fill the pump housing and test system's lower lines.
8.1.2 Reduce the setting of the pressure control valve and turn off cooling water, if not already done.
8.1.3 Jog the pump drive motor ON and OFF switches until fluid is returned to the reservoir.
8.1.4 Start the pump and adjust the speed to 1200 r/min.
8.1.5 Observe the fluid in the reservoir to make sure that it is clear and does not contain noticeable amounts of entrained air before increasing pressure.
NOTE 15 - If fluid cannot be visually observed in the reservoir, the lack of pump noise can be an acceptable indication that the fluid is suitably deaerated.
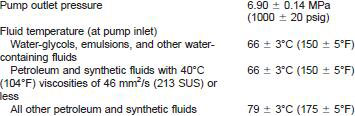
8.1.6 Adjust the pump outlet pressure to 2.10 MPa (300 psig).
8.1.7 Warm up the test fluid for 1/2 h in three 10-min steps, by increasing the pressure levels. The pressure levels are 2.10, 4.15, and 6.20 MPa (300, 600, and 900 psig). During this warm-up period, the pump inlet temperature will be rising. When this temperature is within 3°C (5°F) of the control level, start to apply cooling through the heat exchanger system to minimize temperature override on the test fluid.
8.1.8 If pump vane noise (chatter is heard during the warm-up, the pump can be shut down and the pump head bolts tightened in 0.560- N•m (5 in. lb) increments, using the same tightening sequence as described in 7.3.2, Note 11, in an effort to eliminate the noise.
8.1.9 Verify the pump speed and pump inlet temperature are at the test conditions, and adjust the pump outlet pressure to 6.80 MPa (1000 psig). Refer to 8.1.13 for test conditions.
8.1.10 Do not start the test if the pressure gage shows evidence of unusual relief valve fluctuation or pulsations. (Warning - In addition to other precautions, a protective shield around the pump is recommended.)
8.1.11 Measure and record the fluid flow rate.
8.1.12 Record the clock time or adjust the test system timer to zero and consider this the start of the test.
8.1.13 Operate the system at the following conditions uninterrupted for 1000 h or until operating difficulties dictate test termination.
8.1.14 If the pump efficiency falls below 70 % of its original value prior to 1000 h, the test should be terminated.
8.1.15 Do not replace any pump cartridge components during the test. The test should be terminated in the event of low flow, low pressure, or excessive noise or leaking.
8.1.16 When testing water-based fluids, check the fluid for water content at periods of 250, 500, and 750 h. If it is found that the water content has fallen 12.5 % or more below the original formulation, add distilled water very slowly back to the fluid to maintain the original water content. No shut-down of the test shall be made during these periods.
8.2 Test Shut-Down and Final Parts Inspection:
8.2.1 After completion of the 1000-h test, reduce the pressure control valve setting and stop the pump operation.
8.2.2 Stop the flow of the cooling water.
8.2.3 Observe and record the condition of the test fluid noting any unusual appearance or odor.
8.2.4 Open all drain valves and drain the test system.
8.2.5 Remove the pump head and carefully remove the test cartridge.
NOTE 16 - The use of a bent piano wire inserted through an inlet or outlet port to catch and hold the inner bushing or the use of needle nose pliers to grasp the outer bushing and the rotor hub, or both, facilitates removal of the cartridge.
8.2.6 Observe and record the condition of the reservoir surfaces noting any deposits. System preparation for additional testing in accordance with 7.1 can now proceed.
8.2.7 Carefully disassemble the test pump cartridge and inspect the individual pump cartridge parts for signs of wear, deposit formation, or discoloration. Record any observation.
8.2.8 Remove all deposits from the test pump cartridge cam ring and vanes by thorough cleaning. Rinse in precipitation naphtha and air dry.
8.2.9 Weigh (separately) the used cam ring and the set of twelve used vanes to the nearest milligram. Record these two weights.
8.2.10 Subtract the after test weight (cam ring and twelve vanes separately) from the unused weight to determine the weight loss sustained during the run.